Topic: ADI-2 Pro Volume Control with a Wheel
Follow-up to my post in "ADI-2 remote application" thread.
This is an open thread to share ideas, how to implement simple volume control with a wheel.
My solution(s) is perfectible.
Since few years now, I am using a wheel to control the volume of my ADI-2 Pro (FsR BE)
This is very useful in studio work, near the mouse.
I have a Microsoft Surface Dial (bluetooth).
and a "generic" USB wheel (Google like: "USB Volume knob")
I got the black/metal one with blue light (image here: cubeupload.com/im/qrP722m4/3OwTrr.png)
Both are working wonderfully.
It was a scratch in the head how to do that, and over the years I found various ways.
I share them here hoping someone with more skills can find the perfect solution
1) ADI-2 Pro FSr Volume control through Broadlink RM-4 Pro using Home Assistant.
Since ADI-2 Pro FsR already has a remote, I tought it would be cool if I could "pilote" this remote, or another universal remote.
I found it was possible with Broadlink RM4 Pro universal remote, and a bit of work...
Broadlink RM4 Pro is natively integrated in Home Assistant : an open-source software for home automation and more, running on Debian (Linux OS).
So, you need to have Home Assistant installed, either on a VM or a dedicated device.
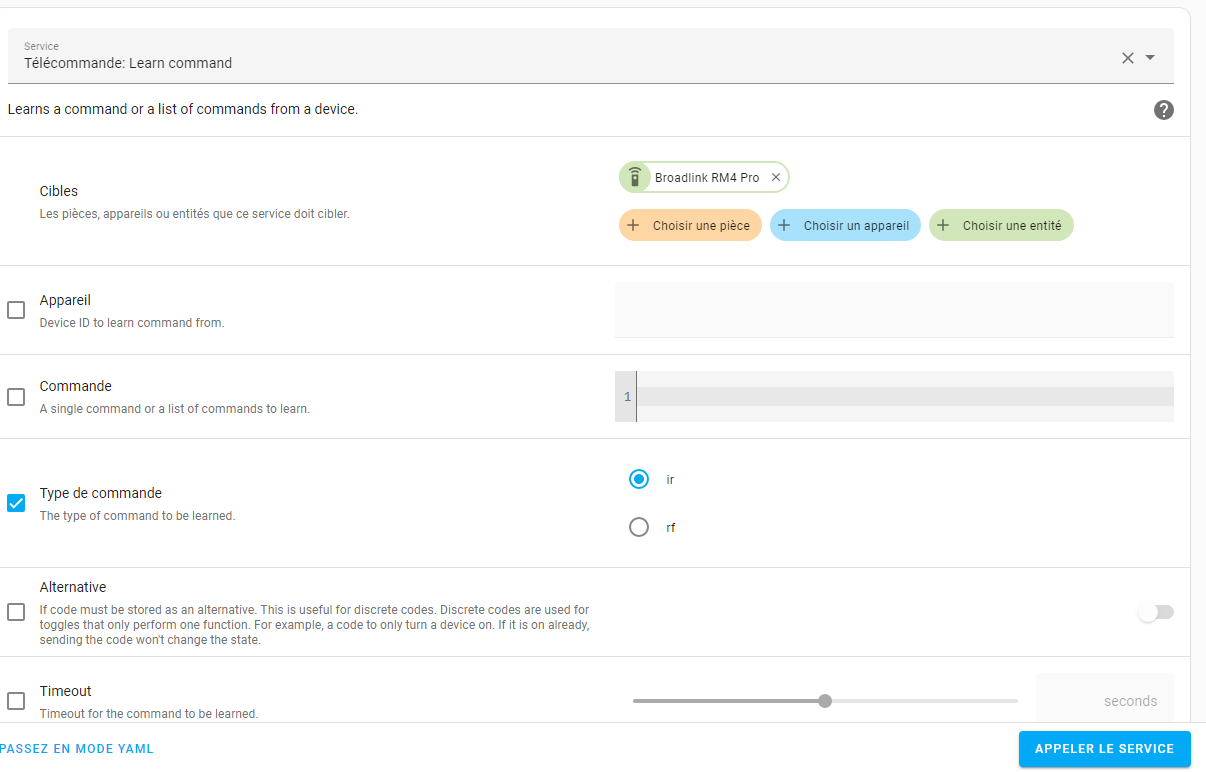
When integrated your RM4 Pro in Home Assistant, you can easily learn your ADI-2 Pro remote commands.
Using developper tools and calling "Learn command" service with your RM4 as target.
This will put the RM4 in "learn mode" .
Then you simply press the button you want to learn on your remote and it will write the IR data to a file in .storage folder
/homeassistant/.storage/broadlink_remote_YOUR-RM4-MAC-Address_codes
example of data:
"Rme Adi2 Pro": { "Power Toggle": "JgBYAAABJpYRFBE5EhQRFBE6ERQRFBIUERQRFBI5ERQROhE5ERQSFBITERQSFBEUERQSOREUEjkRORE6ETkRORI5ERQSOREUEQAFigABKEsSAAxXAAEnSxEADQU=" }Then you can run the commands from Home assistant, using the data or creating a script in scripts.yaml file like this:
volume_up:
  alias: adi_2_volume_up
  sequence:
  - service: remote.send_command
    data:
      device: Rme Adi2 Pro
      command: Power Toggle
#This is the command you created/named while learning it (you can also rename it editing the file in .storage folder)
    target:
      device_id: your_device_id
#This is your RM4 device ID
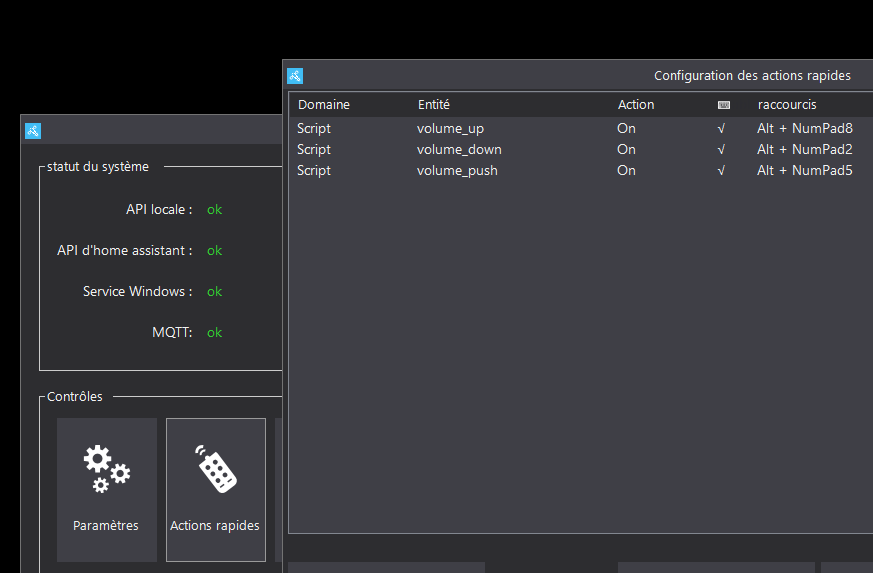
Then with HASS.Agent : a Windows Service to control Home Assistant from your PC.
I just set up "fast actions" to run the script from a simple keyboard shortcut.
Finally I customize wheel settings with my shortcuts.
The ways are different for Surface dial or Usb wheel, but it's not difficult at all.
Conclusion:
Until now this is the best way for me because I haven't found another way to implement the "volume push" (= changing selected volume output" ) .
With a wheel click I can toggle between Speakers volume or Headphone volume and I set volume +or- turning knob left or right.
Problems with this solutions:
- You need universal remote (Broadlink RM4)
- You need Home Assistant, so either a local VM or dedicated device (mini PC running VM, or raspberry Pi)
- You need to install a service on your computer to send commands from your computer (Hass Agent) to Home Assistant.
2) ADI-2 volume control, sending midi sysex commands
Since ADI-2 Remote application release, I saw ADI-2 Pro can be controlled with midi sending sysex.
In the topic mentioned above (adi-2 remote), they provide a .ods (excel) file with a map for every midi controlable function (first post : rme-audio.de/downloads/adi2remote_midi_protocol.zip ). Very cool !!!
The problem is, the mathematics behind functions, bytes, hex, sysex is not totally understandable for me...
A bit of explanation is provided here...
https://www.audiosciencereview.com/foru … st-1733035
But I could'nt get past the device id...too difficult to calculate.
So, I found the easiest solution would be, again, to learn the command (instead of hits and misses for monthes...)
I found those two small command line applications (github.com/gbevin/ReceiveMIDI)
and the other one called sendmidi, as its name says...(github.com/gbevin/SendMIDI)
The cool thing is, this tool is multi-platform, so you might be able to make it work with different devices/os
First you will list your available midi ports :
receivemidi listSecond you will write the commands to the console
receivemidi dev "ADI-2 Pro Midi Port 1" syx(the device name is the one you got from receivemidi list commands)
Here, you can either use the adi-2 pro, or the remote buttons and it will write the sysex commands on the console.
You just have to copy the code provided and find a way to send the commands, here is an example for me:
This commands set Output 1-2 to -41.5 db:
sendmidi dev "ADI-2 Pro Midi Port 1" system-exclusive hex 00 20 0D 72 02 1B 1C61From my understanding, everyone should have 00 20 0D (manufacture), 72 is device ID (ADI-2 Pro) 02 is "sending command", for the rest I don't get it totally I'd need a formula.
Note that those values are PARTICULAR for my device, you need to learn the one from yours if you don't have ADI-2 Pro Fs.
The Device ID is provided in .ods map in adi-2 pro remote topic : rme-audio.de/downloads/adi2remote_midi_protocol.zip
I wrapped all this into 2 batch scripts to be able to set volume level +0.5 and -0.5
You create a .bat or .cmd file and put sendmidi.exe next to it.
Output 1-2 : increment volume by +0.5db
@echo off
set "sendmidi=%~dp0\sendmidi.exe"
set "volume_sensor_folder=%~dp0\VolumeLevel_ADI"
set "default_volume=1C61"
if not exist "%volume_sensor_folder%" ( mkdir "%volume_sensor_folder%" >nul 2>&1 )
cd /d "%volume_sensor_folder%"
for %%a in ("%volume_sensor_folder%\*") do ( set "current_volume=%%~na")
if "%current_volume%"=="" (set "current_volume=%default_volume%")
set /a "decimal_volume=0x%current_volume%"
set /a "new_volume=%decimal_volume%+5"
cmd /C exit %new_volume%
set "new_hex_volume=%=ExitCode:~-4%"
set "val1=%new_hex_volume:~0,2%"
set "val2=%new_hex_volume:~-2%"
cd /d "%volume_sensor_folder%"
del /f /s /q "%volume_sensor_folder%\*" >nul 2>&1
echo >"%volume_sensor_folder%\%new_hex_volume%"
"%sendmidi%" dev "ADI-2 Pro Midi Port 1" system-exclusive hex 00 20 0D 72 02 1B %val1% %val2%
goto :eof
Output 1-2 : Lower volume by -0.5db
@echo off
set "sendmidi=%~dp0\sendmidi.exe"
set "volume_sensor_folder=%~dp0\VolumeLevel_ADI"
set "default_volume=1C61"
if not exist "%volume_sensor_folder%" ( mkdir "%volume_sensor_folder%" >nul 2>&1 )
cd /d "%volume_sensor_folder%"
for %%a in ("%volume_sensor_folder%\*") do ( set "current_volume=%%~na")
if "%current_volume%"=="" (set "current_volume=%default_volume%")
set /a "decimal_volume=0x%current_volume%"
set /a "new_volume=%decimal_volume%-5"
cmd /C exit %new_volume%
set "new_hex_volume=%=ExitCode:~-4%"
set "val1=%new_hex_volume:~0,2%"
set "val2=%new_hex_volume:~-2%"
cd /d "%volume_sensor_folder%"
del /f /s /q "%volume_sensor_folder%\*" >nul 2>&1
echo >"%volume_sensor_folder%\%new_hex_volume%"
"%sendmidi%" dev "ADI-2 Pro Midi Port 1" system-exclusive hex 00 20 0D 72 02 1B %val1% %val2%
goto :eof
If you want smaller increment, for example 0.1, you just need to change the line
set /a "new_volume=%decimal_volume%+5to
set /a "new_volume=%decimal_volume%+1Conclusion:
The biggest problem with this method is we can't have the "volume push" to toggle between Output 1-2 or 3-4 for volume control.
It seems it hasn't been implemented in the remote and midi Sysex, as in the IR controls (in the real remote)
So I can either control Output 1-2 or Output/Phone 3-4.
For those understanding a bit of coding or coding logic, second caveheat is the scripting part.
Only working solution I found is:
Create a folder and set a default volume, to write "current volume" to a file.
That way the script can increment/lower from current volume. You only can set a value with that method, so to set a new value related to current value (+0.5db more), you need to write the current value to a file...
Also I have to toggle between decimal and hex value back and forth, not "optimal"
3) Broadlink Rm4 without Home Assistant with Python
As a reply of my initial post, user @bluetail posted that he developped a cool UI to control Broadlink RM4,
made on python and based on "python broadlink module" (github.com/mjg59/python-broadlink/tree/master)
Basically after installing Python and module you can send commands directly from your computer to Broadlink RM4 universal remote.
Then just download those two files, broadlink_cli and broadlink discovery
Open CMD line and navigate to it:
cd /d "path_of_folder_containing_broadlink_discovery"After that you need to discover your device, to get its ID and mac address
python broadlink_discovery --timeout 10 --dst-ip 192.168.1.61(Replace with your own Broadlink RM4 IP)
It will echo something like this:
Manufacturer : Broadlink DeviceModel : RM4 pro DevType : 0x649b Host : 192.168.1.61 Mac : abcabcabc
Then you will need to learn commands (and saving to text for convenience)
python broadlink_cli --type 0x649b --host 192.168.1.61 --mac abcabcabc --learnfile volumepush.txtPush the volume button (or the one you want to learn) on your remote
It will echo:
Saving to volumepush.txt
Do the same for volume+ and volume- or any command you'd like to record...
Finally, you can send commands using also broadlink_cli
python broadlink_cli --type 0x649b --host 192.168.1.61 --mac MAC -send DATAWhere MAC is the mac address of your RM4
Where DATA is the data you wrote to (and copy from) .txt file
Then, you can do a simple shortcut script like this (putting broadlink_cli next to the script)
@echo off
cd /d "%~dp0"
python broadlink_cli --type 0x649b --host 192.168.1.61 --mac MAC --send DATA
goto :eof
4) I'm sure someone with few skills can provide an easy (and multi platform) tool.
For RME devs, this might perhaps be simple, as setting basic shortcuts for vol+ vol-
(I'm using alt+numeric value, but could be any shortcut which are not used in my daw),
or even different ways!!
For example, I use Elephant to control cutoff filter on some synths with my Surface Dial
(savethehuman5.com/elephant)
Let's make Surface Dial an universal audio volume controller for ADI-2 Pro!!!
If any day RME decided to make a dedicated (wireless) audio knob for ADI-2, I would buy right away.